Hi...well, all my promises of doing better with blogging didn't exactly mean much did it? I have been back in the studio for the past two weekends and I finally have something WOOLIE WORTHY to post about! I am feeling a little stressed already...as it is September and I have to have things ready for three events coming up. The Alamance Co. Arts Council 's "Christmas at Captain White's" 24th annual Holiday Gift Invitational will begin on November 25th. My work has to be there between November 7-14. I have been invited to participate in the 33rd annual Daniel Boone Merchants Association Christmas Craft Show on December 4th. I'm also thinking that I will be participating again this year in the Holiday Bazaar in Greensboro that I was a part of last year. It's usually in mid-December. So I'm starting to really regret not having worked on Woolies all summer long.
This weekend I took inventory of all of the items that I have left from previous shows. That made me feel a smidge better. But I want all new never-been-seen-before-by-human-eyes items for the Arts Council...so I'm like the little workshop elf, cranking out as much as I can in a weekend. Today I started a new item that I had an idea for several months ago. I actually took pictures AS I was making it...instead of after it was already finished. So I'm going to share the start of my first posy wreath..and show you how it's done!
Step One: Covering the styrofoam wreath
I bought a wreath..(and now of course I don't have it here at home and don't have a clue what size)...but I'm guessing it's about 8 or 9 inches across. I'll measure and get back to you! I got it at Hobby Lobby, but you can find these at Michaels and other craft stores.
I found the color green sweater that I thought best coordinated with the red sweater that I planned to make posies out of and began cutting the sweater into strips.
The strips were wide enough to wrap around the wreath and overlap enough for pinning. Using straight pins, I secured the strips to the styrofoam wreath until completely covered. Of course you could use ribbon to cover your wreath, but I like the look of all felted wool.
So there you go...a covered wreath, with pins on the top (since they will be covered) and a smooth looking backside.
Step 2: Making the posies.
I had this beautiful soft sweater that isn't really suitable for many of my projects because it is part angora, part nylon and part lambswool. But it is so soft and such a gorgeous shade of red that I kept it knowing that it would make beautiful flowers! I want the entire wreath covered in flowers, so my plan is to make lots and lots of posies...some larger than others so that the small ones can fill in around the larger ones. Other than some green leaves, I want for my entire wreath to be covered in these red posies. Starting with the sleeves of the sweater, I cut them off and then opened them up flat. For one posy, cut a circle about 4 to 5 inches across. For these flowers, I like the look of them not all being exactly the same. If a pattern is used to cut the circles, then they all are the same exact size, so I tend to just "eyeball it" and cut my circles with no pattern.

Isn't this a beautiful color??? It reminds me of azaleas. Looks really pink in the picture but it's a deep soft red.
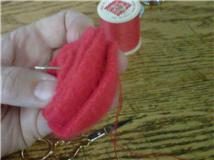
Once the circle is cut, you start at one edge and cut a spiral, leaving a nice round piece in the very middle this will tuck under your posy and give it support and something to sew into.
Begin winding your spiral into a beautiful little flower...
When you finish winding tuck the flat piece at the end underneath.
Then you will begin to handsew with double thread to secure the flower. I go from the back into the center of the flower and then stick the needle sideways through all the layers coming out and down through the back...back and forth as many times as it takes to make it very secure and for the threads to not show.
I pinned it onto the wreath with a long pearl straight pin. I also cut a couple of leaves from the green sweater and will make lots of leaves to mix in around the flowers.
I'm not sure yet that I am sold on pinning all the flowers on with the pearl pins. I may end up hot glueing the flowers and leave the centers plain. Or I may mix it up. This is my first one, so am apt to change my mind a bunch! After looking it over, and sort of "measuring" in a very haphazard way, I figure I'll need probably 9 or 20 larger flowers and maybe 10-12 little ones. So I began cutting LOTS of circles...some the same size as the first one (about 4-5 inches) and some around 3-3 1/2 inches.
As you see, I used every bit of that sweater that I could..and saved those scraps for something that may come along later! I packed the circles, needle and thread and small and large scissors in a box to bring home and plan to make flowers all week! Next weekend, I will plan on posting the finished product! Have a great week...and I WILL be back! :)


No comments:
Post a Comment